Sunday, August 4, 2013

Monsters 1st Birthday Cakes

This was a really special cake for me to make, because just over one year ago I sold my first cake to my friend Joan, for her daughter's baby shower...now here we are celebrating that little guy's first birthday! 


Shannon has always used a Little Monster theme for him, and you can view the shower cake here:   http://pinknteal.blogspot.com/2013/02/monster-baby-shower-cake.html


I love Shannon's idea of making the smash cake a mini Mike Wazowski!  How adorable. 

Sunday, July 21, 2013

Super Mario Cake!

My Blog Has Moved!

Check out this original post and it's pictures here:


Baptism Cake

My friend Julie asked me to make a small Baptism cake for her sweet little Andrew


This is an 8" layer cake decorated in delicate pastels.  I wanted it to have a very simple look yet also suit the precious occasion it celebrates. 

Friday, July 19, 2013

Wednesday, June 26, 2013

25th Wedding Anniversary Cake

I had the joy a making this elegant cake for a friend whose parents celebrated their 25th wedding anniversary.  My friend Julie was throwing a small bash for family and had been loving some white fondant and metallic silver combinations.  We came up with this cake.


The cake was covered in a homemade fondant.  The metallic silver bow was a gum paste/ fondant mixture rolled out, shaped, and airbrushed with a metallic food coloring.  The 25 on top and silver ribbon around the base are thick cuts of rolled fondant, sprayed silver. 

The date was painted by hand onto a rectangular piece of fondant and attached to the cake with clear piping gel.


I am so pleased with how the fondant turned out on this cake.  I was able to try some new techniques and am so happy with the final result.

Tuesday, May 28, 2013

Sugar Cookies

After years of testing and experimenting, I have found my own favorite (and in my opinion, perfectly delicious) sugar cookie & icing recipe combo. 

My cookies are thick and soft, not too sweet.  They hold their shape well when baked.  My icing is thin yet dries to a glossy hard finish.  It is very sweet and you can flavor it with the extract of your choice. 

For the past couple years, I have been using this recipe to make party favors for my girls birthdays.  My friend Lori asked me to make a special batch of my sugar cookies for her husband Steve, who has really had a tremendously awesome past 6 months and deserved a special treat for all his hard work. 

I knew Steve loves fly fishing, so when I was searching through my cookie cutter collection,  I found this never-before used cutter and knew it was the perfect one!

I had some fun with this arrangement.  I delivered them today and he was really grateful!

Fish sugar cookies

 
Fish sugar cookies
 
For my local friends, I can make large sugar cookies for you too! $1 each for order of 1 dozen or more (1 color). If you would like them individually bagged they are $1.25 each.

Friday, May 17, 2013

I mustache you to eat a cupcake.

For my MOPS group end of the year gathering, we decided to give our night a mustache theme since the husbands were invited.  I made these platters of fun cupcakes to go along with the theme!


The big centerpiece mustache is a 6" round cake cut into 2 halves -ying yang shaped- and then arranged to look like a 'stache.  I frosted it in vanilla and then covered in chocolate jimmies.  

It is surrounded by chocolate pound cake cupcakes with vanilla buttercream swirls.

The top tray is a new creation of mine, a twinkie-flavored vanilla pound cake with a whipped vanilla topping.    I used decorated with chocolate fondant mustache cutouts.

Saturday, May 11, 2013

3D Teddy Bear Birthday Cakes

I was asked by my ultra-creative & crafty friend Shannon to make 3D teddy bear cakes for her daughter Merjen's birthday party. 


Shannon had the 3D cake pan for me to use.  It bakes the batter in the shape of this large teddy bear, then you pop it off like a shell and you have this adorable cake.  I actually have the smaller version and I used it for Kaycie's first birthday cake, too.

Since the teddy bears were large cakes and were relatively upright, I used a dense pound cake recipe so they would hold together well.  Shannon also asked for purple over sized bows, and we put one on each bear to match the theme. They were made out of fondant with a little bit of gum paste mixed in.

This cute little pair of bears was a hit with the birthday girls and her guests!


Saturday, May 4, 2013

Unicorn Birthday Cake!

Hold on to your seats Ladies and Gentlemen, it's about to get REALLY girlie up in here......
Unicorns, glitter, AND pink flowers, in one single cake!
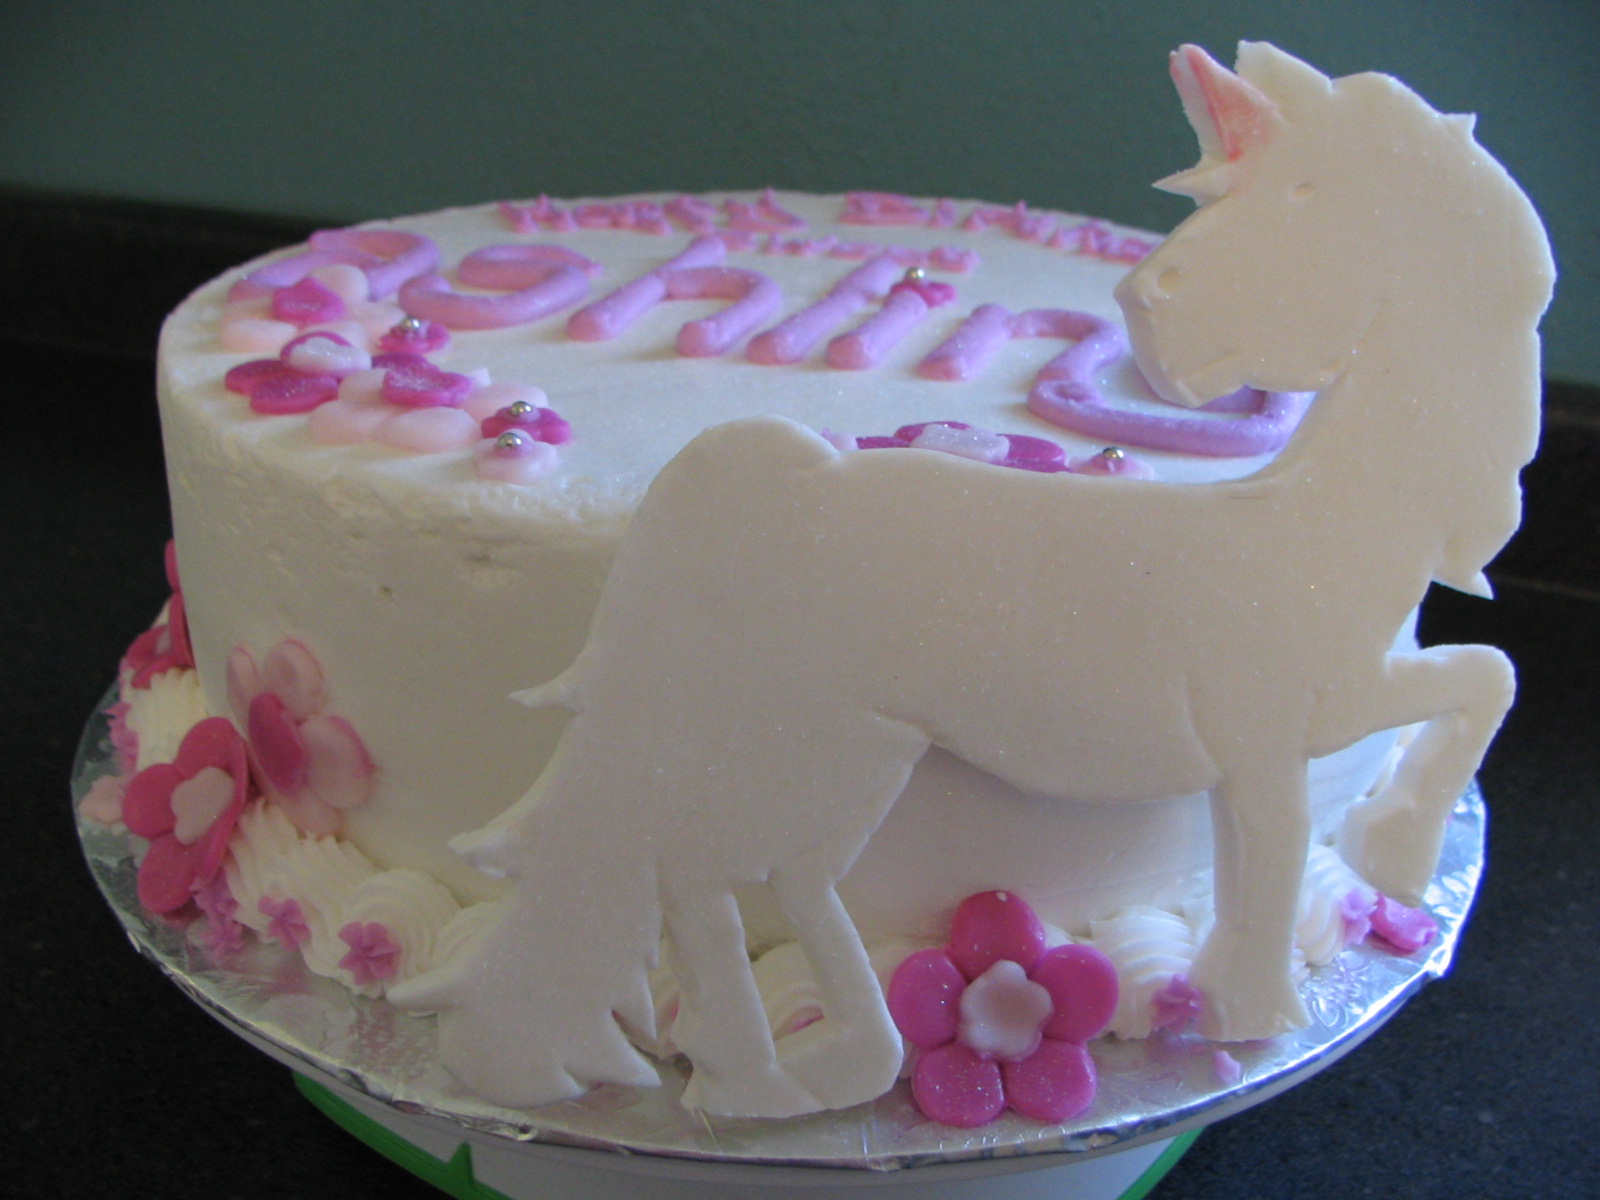
 
My dear friend Janice (yes that's right, 30 & Fabulous) asked me to make a birthday cake for her daughter who turned 3.  She loves unicorns.  She loves pink and purple.  She loves sparkles. 
 
 
We even made the cake batter purple!
This cake features a 6" unicorn made from a 50/50 fondant/gumpaste mix.  It was carved from a sketch I made of the unicorn.  After it dried for 2 days, I added a few subtle details like nose, eyes, mouth, a pink unicorn horn and brushed it with Disco Dust in the "Pixie" color. 
 
I cut the flowers from tinted fondant and attached them to the cake with buttercream.  I also added a few silver dragees to the flowers.  Oh, and glitter (disco dust).  Lots and lots of glitter spattered all over the top and across the flower petals.
 
 
Ashling and all the little girls loved the unicorn cake, and I was on cloud 9 that I could make her so happy on her Birthday.


Saturday, April 27, 2013

Thomas & Friends Train Cake


It was so fun to make this train cake for my friend Dawn, who's littlest turned three last week.  Dawn told me he had been asking for a train cake LONG before his Birthday came along, so we wanted to come up with something special!  We found this fun style browsing train cakes online.  Dawn brought some little toy trains for me to use, and I was able to pipe a tunnel and tracks to match the size of the toys. 

I really enjoyed making this cake, and it was quite a bit more difficult to assemble and frost than I thought it would be. 

I used a bag of chocolate rock candy for the bottom border, tunnel and small accents. This cake is 9" in diameter. It has a single layer on the bottom, then the top layer was cut in half and stacked on top of each other. Because of the weight of the top two tiers, I recommend inserting dowels in the base to support the weight. If you will be transporting this cake, it would be wise to also do a single dowel through all three layers to keep it a little more stable.

Tuesday, April 16, 2013

Combed Chocolate Buttercream Birthday Cake

I had to make a fabulous cake for a fabulous girl. 


My dear friend Janice celebrated her 30th this weekend.  I must give her props for her great attitude about turning thirty-maybe it's because she has been so busy, and life has been pretty sweet lately- but this girl was not sweating thirty AT ALL. 

Janice had really enjoyed the chocolate icing that I used for my daughters birthday cake.  I wanted the cake to look grown-up because it would be served in a nice restaurant (you know, no wait staff singing happy birthday).  I wanted it to look delicious.  I wanted it to have a little somethun'.....that I couldn't quite put my finger on.....

So I kept it simple and delicious, with a batch of dark chocolate buttercream whipped extra to keep it a little lighter than the original.  I iced the cake smooth all over and combed the edges.  Then I was ready to write my message on the top:  "30 & Fabulous"....except I couldn't decide what color to make the writing.  Darker brown?  Black?  White?  Then it came to me:  gold. Shimmering gold. That was definitely the somethun' I was looking for.  I cut the message out of white fondant and painted the gold shimmer onto each piece.  I had 1" cutters for the letters, but had to create my own freehand design for the "30 &"

Since I was so excited about this cake and the busy day surrounding it's presentation, I completely forgot to take a decent picture of it.  Seriously.  All I have are some mobile phone snapshots taken that night at dinner. 


 Happy Birthday Janice, and thanks for a GREAT day and being such a great friend!

Violet Petal Ombre Birthday Cake


My friend Jen asked me to make a cake for a birthday party to celebrate both her and her husband's 40th Birthdays.  After deciding what size she needed, she also told me that I could come up with the design myself!  I have been admiring ombre cakes for quite some time and was excited to give it my first shot.  I loved the petal style but was a little put-off by how much WORK it seemed like....and I'm all about keeping my decorating fun and enjoyable....not tedious.  So I made up my own way of doing it that didn't involve a thousand offset spatula swipes, and mixing a bunch of tiny bowls of tinted frosting.

I started with a double batch of vanilla buttercream.  I did a light crumb coat and iced the top of the cake smooth with white icing, and then reserved a small amount for later. 

thin crumb coat

Start with a big bowl of the lightest color you will use for your cake design.
My first row of petals would be the lightest violet possible. So, add a small amount of color to your big bowl of icing:


 Before working on the cake, I practiced my petals on a practice board.  Using a 12 tip, I made a large dimensional dot at a 90 degree angle, and then pressed down into it and swiped the frosting into a tail:

The great thing about practice boards is that you can pick the practice frosting up with your spatula and put it right back into the bag.  No waste!


I made my first row of petals with the light violet icing.
 
 Then, I squeezed the icing that was still left in the piping back back into the bowl.   

 You can now add a little more violet color to make your icing a shade darker for your next row.  And just keep repeating those steps over and over.  No wasted icing, no spatula swipes and cleaning.
When all the rows on the sides were finished, I used the reserved white icing to pipe matching petals along the top to make a matching border.


Jen is a photographer, so  I was hoping she would appreciate the ombre effect on a cake.  I loved making this cake and will definitely try it again with new colors.
 
Happy Birthday Matt & Jen!

Sunday, April 7, 2013

Mermaid Birthday Cake


I have to admit, this one may be my new favorite.

My Bonus Niece, Aurora, had her 10th Birthday party today.  I made her a mermaid cake to fit her pool party theme.  I had NO idea how cute and extra adorable this cake would turn out...
 
After icing the cake, I combed the edges with a wave to give the ocean vibe.  I went ahead and did the borders first off, too--big swirly waves.  


 Later, I added the little ocean life. like plants, starfish and coral.  I have to give credit to this beautiful cake I found when searching for inspiration...I loved the sea life idea and had to try it.  I also got the idea to do her hair with the grass tip, perfect!


For the mermaid's fin, I used dimensional dots that I just smeared upwards and layered on top of each other.... perfect scales!  I will have to remember this for fish, too!


Happy Birthday Aurora!

Tuesday, April 2, 2013

My First Wedding Cake

My sister-in-law Hollie has thanked me multiple times for making her a wedding cake.  She said it was exactly what she wanted and tasted great.  I feel like I should be the one thanking her....for taking a chance with a new baker for something this important! 

Her theme was butterflies, and the colors were purple and silver.  After perusing the internet for many pretty cakes, and testing out some styles and colors on other projects (My Wilton Course 1 cake was a wedding cake experiment we decided on together!), she found a pretty & simple cake design.  The inspiration came from Pink Cake Box blog.  There is a 3-tier wedding cake that is decorated with butterflies and orchids, just as she wished to decorate hers. 

Hollie's Wedding Cake:


3-tier wedding cake with butterflies and orchids.
So here it is!  It was such an experience from start to finish.  I will never forget the nerve-racking car ride from home to the reception hall....watching the top tier wiggle from the rearview mirror.  And then, carefully and s-l-o-w-l-y carrying it across the street in my arms.   But the cake survived and stayed in tact.  I will be sure to transport a cake this big dissambled next time (if there ever is)   and devoting the extra time on-site to finishing the tiers. 

Logistics:
The flowers are real, wrapped with floral tape and inserted into protective plastic sleeves so that the stems don't come into contact with the cake.  
The ribbon wrapped around each base is held in place with piping gel, which worked fantastic.  It held very firmly, was easy to remove, and best of all, didn't bleed through the ribbon.  It really helped maintain that clean look we were going for!  I recommend testing your ribbon with the piping gel before applying it.  I used  synthetic/plastic-y feeling fabric ribbon.  I think if I had used a more expensive satin, the gel or even butter oils from the icing may have bled through it.  Before serving, I just peeled off the ribbon and started cutting!

The Layers:
Base:  12" 3-layer white cake
Middle:  9"  3-layer chocolate cake
Top:  6:  3-layer spice cake
I'm pretty sure this cake weighed around 50 pounds!


Saturday, March 30, 2013

Easter Basket Cake

I was asked to bring dessert to an Easter lunch & egg hunt we are going to today with the girls....so it was a perfect chance to become familiar with my basket weave technique.  I also used a big rope border.
 
I topped it off with some classic Easter candy and green grass to give it an easter basket feel....

 
I also tried a new frosting recipe that is creamy and delicious....but doesn't quite cut it when it comes to the decorating wtih tips or taking color....but for smooth white icing, it may be my new favorite!
 
Happy Easter

Saturday, March 16, 2013

Fire Truck Cake

I found the Wilton Fire Truck cake pan on clearance about a month ago....how could I resist??

 
I made two cakes, and layered them so that this could be a thick, 2-layer cake.  I decorated it using mostly the star technique and also just plan 'ole smearing on the icing.  My husband's department has white trucks...which look just as cool in real-life as any fire truck, but on  a cake....not so much.  :)  This pan is great, but I think next time I use it I will stick to bright fire truck red paint!


Happy Birthday to my loving, wonderful hard-working husband!

Friday, March 8, 2013

Blue's Clues Birthday Cake

My own sweet Lily turned four today!  I have been absolutely delighted with this little person God has given me, and since everyday as her mom gets better and better I can only imagine how wonderful this year will be!
Lily had made up her mind in January that she wanted a Blue's Clues birthday cake.  I was pretty excited about the idea, because it's a great show and it's full of inspiration for a great cake design.  Most importantly, Lily has been my faithful assistant through most of my cake projects, so it was time to make a REALLY cool cake just for her!


By assistant, I mean "Batter Removal Technician"


She was also having a big birthday party, so we needed a lot of cake.  Two tiers was the way to go!


I didn't want to make little figurines out of gum paste or other edible-type sculptures-- it's really not my thing, and I don't think I would enjoy that type of cake work very much.  Plus, Blue's Clues is very 2-dimensional in it's illustrations, so I felt like even trying to attempt little sculptures would be taking some liberty with the characters.  So I free-handed a Blue dog out of fondant to put on top of the cake:

I surprised myself, because I'm not much of an artist as far as drawing goes...but I can honestly say that the dog really does look just like Blue!

I also added spots on the sides of the cake in fondant, and cut out 2" high letters to put her name on the front.

I am so happy with the way this cake turned out!  It was bright, cheerful & fun...just like my Lily. 

Sunday, March 3, 2013

Ready to Pop! Baby Shower Cake

This cake was made for my friend Jill, who is due to have her 3rd son sometime this month.  I designed this cake with the Ready to Pop! theme because she was 37 weeks along at her shower.  The circle design was intended to look like bubbles, cut from fondant tinted in 4 different colors. 


12" 2 layer cake frosted in buttercream.  Fondant decorations and buttercream border and lettering.

Saturday, March 2, 2013

Minnie Mouse Birthday Cake

What a fun cake this was!  A pink Minnie Mouse themed birthday party calls for lots of mouse ears and bows!  This is a 12" diameter 2-layer chocolate cake.  Iced with vanilla buttercream and decorated with buttercream and fondant.  I made the bow and ears with a 50/50 gumpaste/fondant blend.  I "accidentally" learned a new technique in the process- putting the blend in the oven at 200 degrees with the door propped open creates a billowing/pillow like effect - perfect for the puffy bow...not so much for the slick, black ears.   My friend Mindy and her family loved this cake, and it tasted great, so I am so happy I was able to make Miss Olivia's birthday a little more special.


I have to say that seeing all the cake plates scraped clean was the best compliment I got today!